
working on the xmod!
Home › Forums › Mini-Z, Mini-X, X-Mods and other Mini-Scale › Mini-Z, Mini-X, X-Mods – Discussion › working on the xmod!
- This topic has 47 replies, 13 voices, and was last updated 21 years, 3 months ago by
betty.k.
-
AuthorPosts
-
-
September 29, 2004 at 1:53 am #12358
while i m waiting for some parts i thought i d take the opportunity to do some work on the xmod.
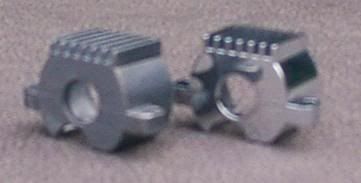
so far i ve given the stage 2 heatsink a bit of a polish
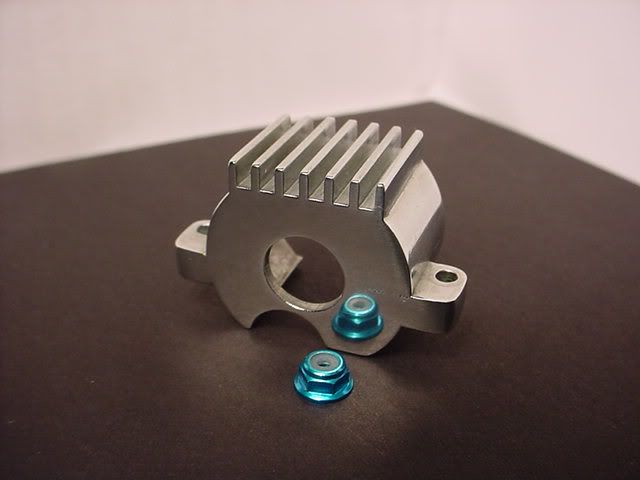
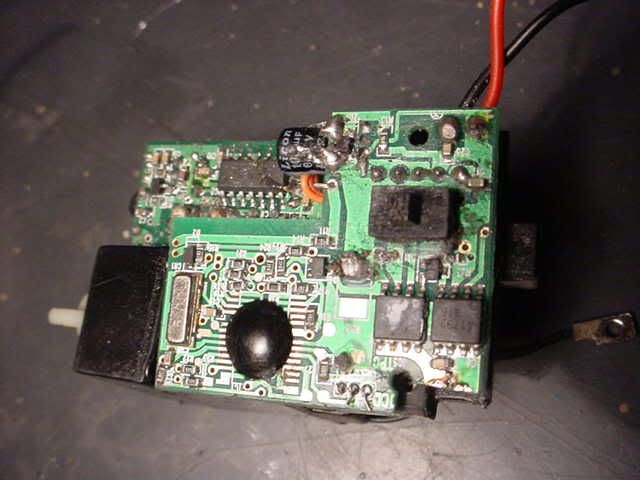
and i ve dropped a nelly in! i decided to go for the neatness factor and did some modding to the heatsink and pcb.
first, as the motor terminals are no longer used i decided to cut that section of the pcb out to allow the signal wires through.
and i cut away the section of heatsink where the fets were and where the wires now run.
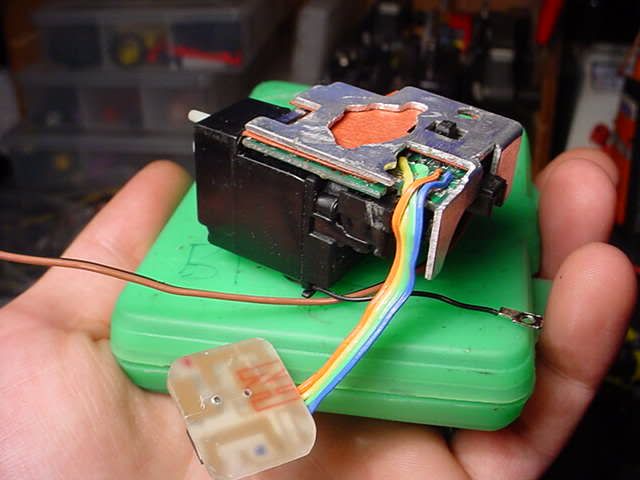
i ll be dropping the s03 in it now that i have a fancy micro pinion puller:p. don t expect too much in the way of body work apart from lots of scrapes and scratches:8ball:
-
September 29, 2004 at 3:19 am #55773
ohhhhhhhhhh now thats a mirror finish.
still gonna use 4 cells? or expand it to have 5 or 6 cells?
-
September 29, 2004 at 4:24 am #55779
Wow i sure like that polish! :shock::shock::shock:
and nice work on everything else 😀
-
September 30, 2004 at 2:55 am #55797
i’m just gonna stick with the 4 cells. initial tests with the stage 2 and nelly are a success so the hotter motor will be fine:8ball:
-
September 30, 2004 at 1:07 pm #55804
yeh its not worth the weight it puts more strain on the drive cups and they break realy easy… if u want more voltage go for 2 cell lithium becasue u got less weight and more volts
-
September 30, 2004 at 9:22 pm #55835
yeah, what he said!
i’ll definately upgrade to alloy cups in the future.so i got it all together. it looks like an electrical nightmare but it’s firing on all cylinders!:p i’m just sticking with the st2 motor for the moment, making sure everything’s running properly first. the nelly adds the torque it needed so it’s fun even without the s03. but when i get that pinion on the s03, lookout!:dead:

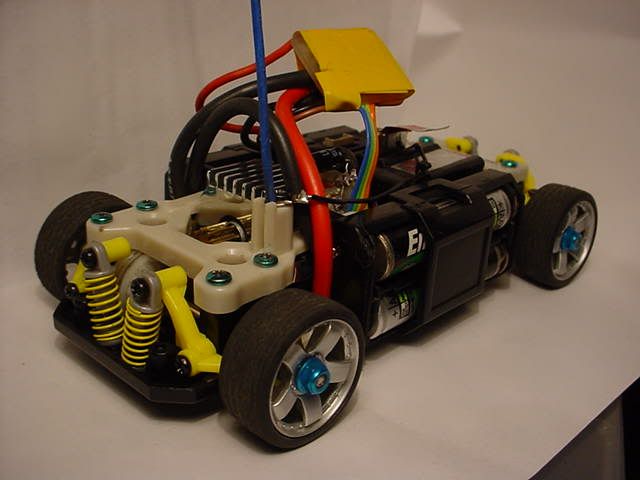
this is the body as it stands. it’s all downhill from here! ………this pic’s for you sg:smiley2::8ball:

-
September 30, 2004 at 10:52 pm #55839
That bonnet scoupe rules!!!!!
-
September 30, 2004 at 11:21 pm #55840
nice xmod betty. wut did u use to polish that heasink. it looks sweet. wut parts are u waiting for?
-
October 1, 2004 at 3:48 am #55855
there was a lotta labour involved in polishing that heatsink. started with some sandpaper to smooth the casting marks off, then some really fine sandpaper. then (and i’m not lying) i polished it with toothpaste and a rag. toothpaste is slightly abrasive and is a great cutting compound. finally i used a silver cloth to get the mirror finish. takes a long time but it’s worth it.:smiley2:
i got the parts i was waiting for, that’s it complete apart from the s03. i’m sure any xmod owner knows the part i broke, rear drive cup!:8ball: -
October 1, 2004 at 4:47 am #55856
was it a rouge cloth betty? red polish on one cloth, white plain on the other?
im in the silver buisness. and boy do i do a lot of polishing of silver pieces….

-
October 1, 2004 at 7:19 am #55859
i guess i cheated haha i jus used a dremil. polished heat sinks are cool. its almost night and day compared to how the come stock
wut part of tha cup did u break? if its jus tha cup part and not tha small shaft. u can do this
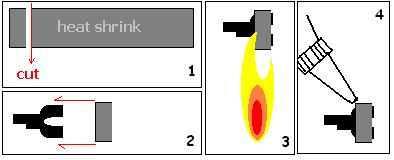
to keep it from happening again, or jus until u get alloys wich is a great thing to have. -
October 1, 2004 at 2:28 pm #55863
What a bloody excellent idea chino!
🙂
ph2t.
-
October 1, 2004 at 4:46 pm #55865
Weird, i use a woah nelly turbo, bb+ neo’d PD and i havent had a drivecup break yet.
-
October 1, 2004 at 4:53 pm #55867
oh yeah, if the heat shrink use is a lil to thick, ull have to do a lil shaving
hey betty also if u wannah try a rear mono shock, it helps with the cars balance


use soft springsEdited by – chino on 01 October 2004 13:03:28
-
October 1, 2004 at 7:33 pm #55873
i’m still not sold on the monoshock idea. one advantage though is that you can remove those shock holders from the rear lower deck. it’s the part that hits the ground the most. but it’s still a great idea, as is all the others from chino!:smiley2:
the silver cloth is just one i bought from the supermarket. it comes impregnated with polish so you just open the pack and go for it.update.
i managed to get a pinion on the s03.
xmod + nelly + s03 = 🙂
i estimate a 30% increase in speed and visible increase in top end torque over the stage 2’s. this thing kicks ass!:8ball:Edited by – betty.k on 01 October 2004 21:56:10
-
October 2, 2004 at 12:38 pm #55879
trim the imperfections ur tires wit a nail cutter. that also helps the cars balance.

Edited by – chino on 02 October 2004 09:04:54
-
October 2, 2004 at 4:40 pm #55880
chino my man, you’re a legend!:D many wisdoms in that skull of yours!:8ball:
-
October 2, 2004 at 5:26 pm #55883
haha. thnx but only cus ive had my xmod since they came out. well hers a bit more.
if u wannah try out mixing bevels and pinions like(11t pinion /wht bevel) ull need to make spacers under tha mount by cuttin off pieces off tha end of a ball piont pen’s ink tube
-
October 3, 2004 at 2:24 am #55886
chino, u da man of xmods. betty k maybe stickin an iwaver into that xmod could be ur next project. hehehhe just a thought
-
October 3, 2004 at 4:09 am #55889
alot of ppl has dont it already, mainly for thoe who want more space or ottom mounted cells. heres a guy from down under that did that. u guys prolly seen it already.

i did one car with a miniz rear end.
http://photobucket.com/albums/v51/chino925/Zmods/Edited by – chino on 03 October 2004 00:10:36
-
October 3, 2004 at 1:47 pm #55893
hey chino whats the name of the guy sho did that.. u got hi email.. cause that would be so easy to make and soo cool
-
October 3, 2004 at 8:26 pm #55898
ionnoe too much about him, but his name is “and”
heres the thread of his car, he made scans of his decks so it would be pretty easy to copyhttp://p221.ezboard.com/fxmodrcfrm34.showMessage?topicID=61.topic
heres another one.
http://mitglied.lycos.de/accal/modder.jpgdoin custum chassies has been a thing lately. i dont hav too much money so this is my idea of a custom cassie
http://img.photobucket.com/albums/v51/chino925/project%20anti%20RS4/chas.jpghaha ceap but effective, my car is lighter than a feins and he has got cf chassie
-
October 4, 2004 at 1:23 am #55901
man, how good is the steering resistor mod!!:p i dead set halved my turning circle. this is the mod i’m talking about:
http://www1.bbiq.jp/ikinari/xmods/index.html
most of the times i’ve seen this done it’s been with a 4.7k resistor. but i decided to err on the side of too much and used 6.8k’s. it’s easy to reduce the steering on the tx to make up for it.:8ball:
-
October 4, 2004 at 1:28 am #55903
lol betty i ranted and rave on about this mod for ages.. its bloody great isnt it
-
October 4, 2004 at 4:17 am #55907
i love the modded chassis.
chino: the guy is from Austria not Australia. -
October 4, 2004 at 11:54 pm #55924Quote:while i’m waiting for some parts i thought i’d take the opportunity to do some work on the xmod.
so far i’ve given the stage 2 heatsink a bit of a polish
How did you polish between the grooves on the heatsink:smiley2:
-
October 5, 2004 at 1:48 am #55925
i folded over a piece of sandpaper and did each groove separately. then the same thing but with the silver cloth.:8ball:
-
October 5, 2004 at 1:55 am #55926
I thought as much about the folding of the cloth but not the sandpaper !
Cheers for the info mate…:smiley2: -
October 5, 2004 at 2:19 am #55929
i still reckon xmods suffers loss in the drivetrain, maybe beta bevelled gears suggested would be a goot addition. i can prolly get my hands on some red cf if any1 wants to design and make a custom xmod. i’d be willin to pitch in.
-
October 5, 2004 at 2:55 am #55931
ohhh austria! my bad. haha yeah i luv the resistor mod. jus remember to trim tha giudes on ur tie rod so nuthing bindes.
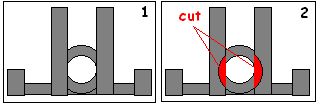
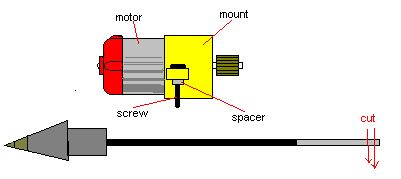
and if u wannah more solid feeling servo, or if it jus starts to slip all the time heres a fix

thats the main gear assembly of the xmod servo. basicly placing spacers found on motor armatures between the 2 sets of gears as shown. either this or a drop of superglue on the servo saver(part of the gear set right of the spacers where the two gear dis engage from each otherthis jus disables the xmod’s biult in servo saver. well it wont be tottally disable it. it will click* click* when abrubtly moved or when u crash w/o a body. but dot worry to much about disabling the saver. unlike MR-01 the gear wont break due to the weaker motor, it will give befor it will ever break anything. i have this mod done to all my xmods, including my off roader/rock crawler. nuthing has ever went wrong
-
October 6, 2004 at 12:22 pm #55955
hey betty, jus in case u break ur knuckles

-
October 12, 2004 at 3:10 am #56065
nice one chino!:smiley2: i did a knuckle a while back and used some lolly pop stick. funny thing is this plastic is smoother than the knuckle stuff!
anyways, i got over that by shortening the bottom protrusions on the knuckles. means i have less travel but it’s been handling fine, and no more ripped up knuckles:)
i did the heat shrink trick on the drive cups, i’m surprised how much strength this adds. enough for me to break a universal joint anyway!:dead:
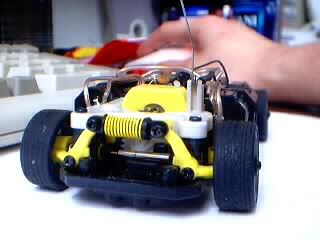
i pulled out my iwaver porsche body and mounted it with velcro on the sides and an extension tab up front. i’m amazed how solid this setup is, much easier than trying to get that clip positioned right. and i was able to mount it really low, about 1 – 2 mm below the middle of the chassis with no wheel contact. but the wheelbase looked too narrow, the body looked silly being that much wider than the wheels.
so i turned the wheels inside out. much phatter!:p some washers are needed to stop the wheels rubbing on the hubs but this is a total dream setup! corners like it’s on rails (bumpy ones!)this truly is the 1/28 for me:smiley16::8ball:
-
October 12, 2004 at 3:15 am #56066
under the hood pic:8ball:
-
October 12, 2004 at 3:26 am #56070
That porsche has taken a good beatin since I last saw it 🙂
-
October 13, 2004 at 2:25 am #56089
nice one betty. why dont u put ur evo body on it. u know, since its 4wd. hehe i want that bodie
-
October 13, 2004 at 4:20 am #56100
i noticed ur still running only 9tooth. if u want, they that motor lift thing a posted before and use a 11tooth pinion with that red bevel. it should be a great acceleration and a good top speed, especially with your set up. (nelly and s03)
-
October 13, 2004 at 12:02 pm #56105
i plan on doing that. my biggest problem at the moment is the universal joints on the front axle, any tips for strengthening them?:8ball:
-
October 13, 2004 at 5:54 pm #56117
haha not really. but thoes things are suprisingly pretty strong. out of the whole time of my xmod truckin i only broke one, and it wust tha cv joint part it wus the shaft that gos in to the wheels. i rammed full speed in to a chair leg with my right tire. took tha shaft right off the joint. the front cups will go out way before the cvs do. on the truck now ever since my new gear settings ive bee doin sum mjoir off raoding and reverse whellies are no problem for it. and able to do stoppies where the rear wheels go up like a sport bike. the bigger tires puts so much more stress on tha drive train than the smaller tires, and it handles it with ease.
it should be no problem at all for thoes lil tires. cups will go out (if heat shrinked, the shft end will round out) way before the CVs ever break. but if u still dont trust its strength jus use the ball diff in front. slips enough not to break anything and grabs just enough to pull the car for stability on corners. also does wonders for drifting. the circle clear plastic things the xmod tires com in new make good cocrete drift tires.
-
October 15, 2004 at 4:34 pm #56162
as a result of outdoor use and abuse i noticed that the holes in the chassis where the knuckles poke through get worn quickly. and the front end is sloppy enough new so i decided to do summink about it.
i found some brass eyelets like the ones used for shoelace holes and filed em down some so they didn’t poke through the other side. i had to file out the inner diameter some to allow the knuckle to move freely. i just superglued them in place and it’s another winner! really tight front end now, nice accurate steering.
so i’m still in a modding mood after that and i start eyeing off my spare chassis and i waver pcb:shock:


this is real easy to do. just take your time and plan it out. i studied this site before i started out. http://www1.bbiq.jp/ikinari/xmods/index.html
results? well the turning circle is increased from that of a resistor modded xmod but is better than a stock one. range is as good as an i waver (well duh!). and no more brake.
but it’s the torque increase that amazed me! from my observations it seems that the iwaver pcb opens up the nelly more than an xmod’s. and there’s much less latency. when i hit that trigger the beast instantaneously drops a 4 wheel burnout! this never happened before.but i honestly prefer the xmod pcb. it’s the brake i miss. BUT if i get hold of a mr02 pcb i’ll be set:8ball:
-
October 15, 2004 at 11:22 pm #56165
cool stuff man, can’t wait to see it.
I’ve rebuilt my xmod again, cleaned everything, replaced the bb’s with the new VXD set, so far so good. I’ve now completed the steering mod as well and it’s al looking promising.
man, you can sit down and waste hours just fine tuning the xmod chassis. It makes the biggest difference when you can really minimise the drive train losses in the car…. that’s why I want an all alloy rear and front setup, lol…..
ph2t.
-
October 16, 2004 at 11:09 am #56169
another reason behind the difference in torque between the two PCB’s is that the frequency of the PWM speed controll on the iWaver PCB is prolly higher than that of the RS PCB. This leads to a higher amount of power being transferred into the motor. Hence why higher speed ESC’s are known as more efficient devices…. this efficiency in energy translates to increased torque….
ph2t.
-
October 17, 2004 at 9:07 am #56182
well that makes sense to me.
i got a pic during the change over so you can see what’s involved. this mod probably lightens the overall weight but not by much. the torque increase and higher resolution propo are the pluses.:8ball:

-
October 18, 2004 at 8:00 pm #56224
u have 2 of them?
-
October 18, 2004 at 8:09 pm #56225
Know i want 1 !!!
-
October 18, 2004 at 8:47 pm #56227
yep, got 2. but only 1 running. with some more parts i’ll set up the other with the i waver pcb for the track:8ball:
-
October 18, 2004 at 9:53 pm #56233
That link that you posted Betty
http://www1.bbiq.jp/ikinari/xmods/index.html
Is One of the biggest mind fucks ive seen when it comes to modding R/C, im still salovating
Mind boggling stuff…:smiley2::D:D:D:D:D:p:approve::shock::smiley2: -
October 19, 2004 at 1:37 pm #56251
betty, was reading at xmodworld and got this tidbit of info:
Quote:In case you get confused with the reason to modify the Xmods Servo:
the little series motor of the Xmods servo works pretty slow with the iWaver PCB. reason? No Idea, I was told so. So microsash just tested some similar motors and chose a 1,6 Bit-Charg. More powerful Bit motors are not needed.So it looks like once you’ve converted the xmod to use the iwaver PCB you need to change the motor in the servo to a BCG 1.6.
Here’s a link to the thread:
http://www.xmodworld.com/modules.php?name=Forums&file=viewtopic&t=8033&postdays=0&postorder=asc&start=0ph2t.
-
October 19, 2004 at 5:02 pm #56256
interesting, i had no torque issues with the stock servo motor, but still worth doing i think.:8ball:
-
-
AuthorPosts
- You must be logged in to reply to this topic.